1. 你将构建什么? #
一个天气 MCP 服务器,提供两个工具:
| 工具 | 功能 |
|---|---|
get_alerts |
查询美国某州的天气警报 |
get_forecast |
查询某经纬度的天气预报 |
说明:本教程使用 Claude for Desktop 作为客户端示例。服务器可连接任何 MCP 客户端,完整代码见 GitHub 仓库。
2. 前置要求 #
| 要求 | 说明 |
|---|---|
| Python 3.10+ | 需已安装 |
| MCP Python SDK 1.2.0+ | 本教程会通过 uv add 安装 |
| 基础 Python 知识 | 能看懂函数、异步、装饰器 |
| 了解 LLM | 知道 Claude 等模型的基本用法 |
3. STDIO 服务器的日志规则 #
使用 STDIO 传输时,不要往 stdout 写任何内容,否则会破坏 JSON-RPC 消息,导致服务器崩溃。
| 方式 | 是否安全 |
|---|---|
print("xxx") |
❌ 默认写 stdout,会破坏协议 |
print("xxx", file=sys.stderr) |
✅ 写 stderr,安全 |
logging.info("xxx") |
✅ 默认写 stderr,安全 |
4. 环境准备 #
4.1 步骤 1:安装 uv(Python 包管理工具) #
macOS/Linux:
curl -LsSf https://astral.sh/uv/install.sh | shWindows:
powershell -ExecutionPolicy ByPass -c "irm https://astral.sh/uv/install.ps1 | iex"安装后重启终端,确保能识别 uv 命令。
4.2 步骤 2:创建项目 #
macOS/Linux:
uv init weather
cd weather
uv venv
source .venv/bin/activate
uv add "mcp[cli]" httpx
touch weather.py
Windows:
uv init weather
cd weather
uv venv
.venv\Scripts\activate
uv add "mcp[cli]" httpx
New-Item weather.py
5 编写服务器代码 #
5.1 导入与初始化 #
在 weather.py 顶部添加:
# 导入类型注解模块,用于类型提示
from typing import Any

# 导入 httpx,用于异步 HTTP 请求
import httpx
# 从 MCP SDK 导入 FastMCP,用于快速创建 MCP 服务器
from mcp.server.fastmcp import FastMCP

# 创建名为 "weather" 的 FastMCP 服务器实例
mcp = FastMCP("weather")
# 美国国家气象局 API 的基础 URL
NWS_API_BASE = "https://api.weather.gov"
# 请求时使用的 User-Agent,NWS API 要求必须提供
USER_AGENT = "weather-app/1.0"提示:FastMCP 会根据函数签名和 docstring 自动生成工具定义,无需手写元数据。
5.2 辅助函数 #
# 定义异步函数:向 NWS API 发起请求,返回 JSON 或 None
async def make_nws_request(url: str) -> dict[str, Any] | None:
    # 函数的文档字符串,说明用途
    """请求 NWS API,带错误处理。"""
    # 设置请求头:User-Agent 为必填项,Accept 指定返回 GeoJSON 格式
    headers = {"User-Agent": USER_AGENT, "Accept": "application/geo+json"}
    # 创建异步 HTTP 客户端上下文
    async with httpx.AsyncClient() as client:
        # 捕获请求过程中的异常
        try:
            # 发起 GET 请求,超时 30 秒
            response = await client.get(url, headers=headers, timeout=30.0)
            # 若 HTTP 状态码为 4xx/5xx 则抛出异常
            response.raise_for_status()
            # 解析并返回 JSON 响应体
            return response.json()
        # 发生任何异常时返回 None,不中断程序
        except Exception:
            return None


# 定义函数:将单条警报数据格式化为可读字符串
def format_alert(feature: dict) -> str:
    # 函数的文档字符串
    """将警报数据格式化为可读字符串。"""
    # 从 GeoJSON feature 中取出 properties 字段
    props = feature["properties"]
    # 使用 f-string 拼接多行文本,包含事件、区域、严重程度、描述和指导
    return f"""
    Event: {props.get("event", "Unknown")}
    Area: {props.get("areaDesc", "Unknown")}
    Severity: {props.get("severity", "Unknown")}
    Description: {props.get("description", "No description available")}
    Instructions: {props.get("instruction", "No specific instructions provided")}
    """
5.3 实现两个工具 #
# 使用 @mcp.tool() 装饰器,将该函数注册为 MCP 工具
@mcp.tool()
# 定义异步工具函数:根据州代码获取该州的天气警报
async def get_alerts(state: str) -> str:
    # 文档字符串:说明工具用途及参数
    """获取美国某州的天气警报。

    Args:
        state: 两字母州代码(如 CA, NY)
    """
    # 拼接 NWS 警报 API 的 URL
    url = f"{NWS_API_BASE}/alerts/active/area/{state}"
    # 发起异步请求获取数据
    data = await make_nws_request(url)

    # 若请求失败或响应中无 features 字段,返回提示信息
    if not data or "features" not in data:
        return "无法获取警报或未找到警报。"

    # 若 features 为空列表,说明该州暂无警报
    if not data["features"]:
        return "该州暂无活跃警报。"

    # 用列表推导式将每条警报格式化为可读字符串
    alerts = [format_alert(f) for f in data["features"]]
    # 用分隔符拼接多条警报并返回
    return "\n---\n".join(alerts)


# 使用 @mcp.tool() 装饰器,将该函数注册为 MCP 工具
@mcp.tool()
# 定义异步工具函数:根据经纬度获取天气预报
async def get_forecast(latitude: float, longitude: float) -> str:
    # 文档字符串:说明工具用途及参数
    """获取某经纬度的天气预报。

    Args:
        latitude: 纬度
        longitude: 经度
    """
    # 拼接 NWS 点位 API 的 URL,用于获取该坐标的元数据
    points_url = f"{NWS_API_BASE}/points/{latitude},{longitude}"
    # 请求点位数据,其中包含预报接口的 URL
    points_data = await make_nws_request(points_url)

    # 若点位请求失败,返回提示信息
    if not points_data:
        return "无法获取该位置的预报数据。"

    # 从点位数据的 properties 中取出预报接口 URL
    forecast_url = points_data["properties"]["forecast"]
    # 请求详细预报数据
    forecast_data = await make_nws_request(forecast_url)

    # 若预报请求失败,返回提示信息
    if not forecast_data:
        return "无法获取详细预报。"

    # 从预报数据中取出各时段列表
    periods = forecast_data["properties"]["periods"]
    # 初始化用于存放格式化预报的列表
    forecasts = []
    # 遍历前 5 个时段(如今天、今晚、明天等)
    for period in periods[:5]:
        # 将每个时段的名称、温度、风力、详细描述格式化为字符串并追加
        forecasts.append(f"""
        {period["name"]}:
        Temperature: {period["temperature"]}°{period["temperatureUnit"]}
        Wind: {period["windSpeed"]} {period["windDirection"]}
        Forecast: {period["detailedForecast"]}
        """)

    # 用分隔符拼接各时段预报并返回
    return "\n---\n".join(forecasts)
5.4 启动服务器 #
在文件末尾添加:
# 定义主函数,用于启动 MCP 服务器
def main():
    # 以 stdio 传输方式运行服务器,通过标准输入/输出与客户端通信
    mcp.run(transport="stdio")


# 当脚本被直接执行(而非被导入)时,调用 main 启动服务器
if __name__ == "__main__":
    main()
6. 本地测试 #
在项目目录下运行:
uv run weather.py若服务器正常启动,会等待来自 MCP 客户端的消息。按 Ctrl+C 可退出。
7 连接到 Claude Desktop #
7.1 步骤 1:打开配置文件 #
- macOS:
~/Library/Application Support/Claude/claude_desktop_config.json - Windows:
%APPDATA%\Claude\claude_desktop_config.json
若文件不存在,先创建。可用 VS Code 打开:
# macOS/Linux
code ~/Library/Application\ Support/Claude/claude_desktop_config.json

# Windows
code $env:AppData\Claude\claude_desktop_config.json
7.2 步骤 2:添加 weather 服务器配置 #
将 mcpServers 配置为(把路径换成你的实际项目路径):
macOS/Linux:
{
  "mcpServers": {
    "weather": {
      "command": "uv",
      "args": [
        "--directory",
        "/你的绝对路径/weather",
        "run",
        "weather.py"
      ]
    }
  }
}
Windows:
{
  "mcpServers": {
    "weather": {
      "command": "uv",
      "args": [
        "--directory",
        "C:\\你的绝对路径\\weather",
        "run",
        "weather.py"
      ]
    }
  }
}提示:
- 路径必须是绝对路径。macOS/Linux 用
pwd查看,Windows 用cd查看- Windows 下 JSON 中的路径用双反斜杠
\\或正斜杠/- 若
uv找不到,可在command中写uv的完整路径(which uv或where uv可查)
7.3 步骤 3:重启 Claude Desktop #
完全退出应用(不是只关窗口):
- macOS:Cmd+Q 或菜单「Quit Claude」
- Windows:右键托盘图标 → 退出
然后重新启动 Claude Desktop。
8. 验证是否成功 #
- 点击输入框旁的 「+」 或 「/」 按钮
- 在 Connectors 菜单中应能看到 weather 服务器
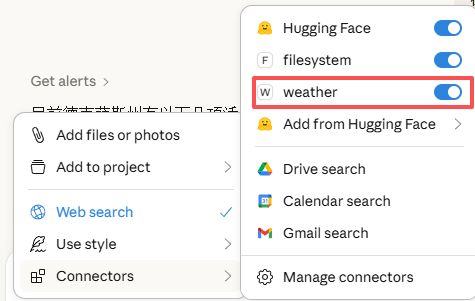
- 可尝试提问:
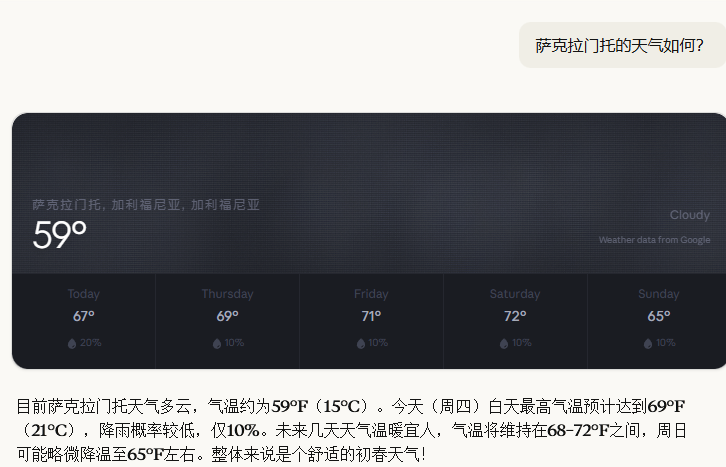
- 「萨克拉门托的天气如何?」
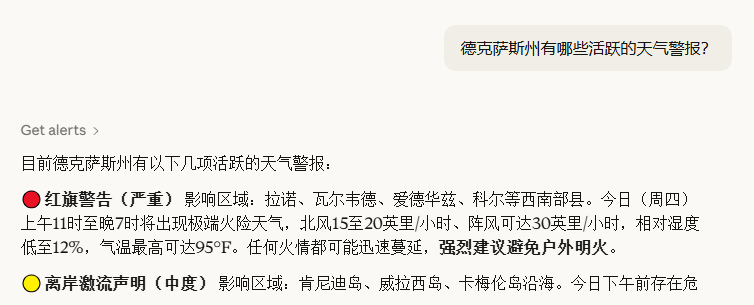
- 「德克萨斯州有哪些活跃的天气警报?」
⚠️ 说明:本示例使用美国国家气象局 API,仅支持美国境内位置。
9. 幕后原理 #
当你在 Claude 中提问时:
- 客户端把你的问题发给 Claude
- Claude 分析可用工具,决定调用哪些
- 客户端通过 MCP 向服务器发起工具调用
- 服务器执行并返回结果
- 结果传回 Claude,Claude 生成自然语言回答
- 回答展示给你
10. 故障排除 #
10.1 问题 1:服务器未在 Claude 中显示 #
- 检查
claude_desktop_config.json的 JSON 语法 - 确认路径为绝对路径
- 完全退出并重启 Claude Desktop(不是只关窗口)
10.2 问题 2:工具调用失败 #
- 查看 Claude 日志:
~/Library/Logs/Claude/mcp*.log(macOS)或%APPDATA%\Claude\logs\mcp*.log(Windows) - 在终端手动运行
uv run weather.py,看是否有报错 - 尝试重启 Claude Desktop
10.3 问题 3:天气 API 相关错误 #
| 错误 | 可能原因 | 建议 |
|---|---|---|
| 无法检索网格点数据 | 坐标在美国境外、API 异常、被限流 | 使用美国坐标、加延迟、查 NWS 状态页 |
| [STATE] 无活跃警报 | 该州当前无警报 | 非错误,可换州或改天再试 |
11. 本章小结 #
- 工具定义:用 `@mcp.tool()` 装饰器,FastMCP 自动生成元数据
- STDIO 日志:只写 stderr,不写 stdout
- 配置:在
claude_desktop_config.json中指定command和args - 路径:必须使用绝对路径,Windows 注意
\\转义