1. 什么是 MCP 授权? #
授权(Authorization)用来控制「谁可以访问什么」:只有通过身份验证、且被允许的用户,才能访问 MCP 服务器提供的敏感资源或执行敏感操作。
| 概念 | 通俗理解 |
|---|---|
| 无授权 | 任何人连上服务器就能用,适合本地、测试 |
| 有授权 | 需先登录、同意权限,才能调用工具或资源 |
MCP 使用 OAuth 2.1 标准实现授权,不绑定特定身份系统,可与各类授权服务(如 Keycloak、Auth0)配合。详细规范见 授权规范。
2. 本章你将学到 #
- 什么时候需要为 MCP 服务器加授权
- 本地服务器 vs 远程服务器在授权上的区别
- OAuth 授权流程的 6 个步骤
- 用 Keycloak + Python 搭建一个带授权的 MCP 服务器
- 常见安全陷阱及规避方法
3. 何时需要授权? #
授权是可选的,但以下场景强烈建议使用:
| 场景 | 说明 |
|---|---|
| 访问用户数据 | 邮件、文档、数据库等敏感信息 |
| 需要审计 | 记录谁在何时执行了哪些操作 |
| 第三方 API 需用户同意 | 如 OAuth 授权访问 Google、GitHub 等 |
| 企业环境 | 有严格访问控制要求 |
| 按用户限流或计费 | 需要区分不同用户的使用量 |
3.1 本地 vs 远程:授权方式不同 #
| 传输方式 | 典型场景 | 授权方式 |
|---|---|---|
| STDIO(本地) | 客户端和服务器在同一台机器 | 可用环境变量、本地凭据或第三方库,不一定走 OAuth |
| HTTP/SSE(远程) | 服务器在远程,客户端通过网络连接 | 通常用 OAuth:用户登录、授权,客户端拿到令牌后访问 |
小结:本地 STDIO 服务器授权方式灵活;远程 HTTP 服务器通常用 OAuth 建立「用户已授权」的信任。
4. 授权流程概览 #
当客户端连接受保护的 MCP 服务器时,大致经历以下步骤:
客户端请求 → 401 + 元数据地址
     ↓
获取「受保护资源元数据」→ 知道授权服务器在哪
     ↓
获取「授权服务器元数据」→ 知道登录、换令牌等接口
     ↓
客户端注册(预注册或动态注册)
     ↓
用户登录并授权 → 拿到 access_token
     ↓
带 token 请求 MCP 服务器 → 验证通过后正常访问
5. 授权流程:分步说明 #
5.1 初始握手:401 + 元数据地址 #
客户端首次请求时,服务器返回 401 Unauthorized,并在响应头中告诉客户端「去哪获取授权信息」:
HTTP/1.1 401 Unauthorized
WWW-Authenticate: Bearer realm="mcp",
  resource_metadata="https://your-server.com/.well-known/oauth-protected-resource"
客户端据此知道:需要授权,且元数据文档在 resource_metadata 指向的地址。
5.2 受保护资源元数据(PRM) #
客户端请求该元数据文档,获取授权服务器地址、支持的 scope 等:
{
  "resource": "https://your-server.com/mcp",
  "authorization_servers": ["https://auth.your-server.com"],
  "scopes_supported": ["mcp:tools", "mcp:resources"]
}
更多字段见 RFC 9728 第 3.2 节。
5.3 授权服务器发现 #
客户端根据 PRM 中的 authorization_servers,请求授权服务器的元数据(OIDC Discovery 或 OAuth 2.0 元数据),获取登录、换令牌等端点:
{
  "issuer": "https://auth.your-server.com",
  "authorization_endpoint": "https://auth.your-server.com/authorize",
  "token_endpoint": "https://auth.your-server.com/token",
  "registration_endpoint": "https://auth.your-server.com/register"
}
5.4 客户端注册 #
客户端需要在授权服务器上「登记」自己,有两种方式:
| 方式 | 说明 |
|---|---|
| 预注册 | 管理员提前在授权服务器中创建客户端,客户端内置 client_id 等 |
| 动态注册(DCR) | 客户端向 registration_endpoint 提交信息,自动完成注册 |
动态注册示例请求:
{
  "client_name": "My MCP Client",
  "redirect_uris": ["http://localhost:3000/callback"],
  "grant_types": ["authorization_code", "refresh_token"],
  "response_types": ["code"]
}
若授权服务器不支持 DCR,且客户端未预注册,则需要用户手动输入客户端信息。
5.5 用户授权 #
客户端打开浏览器,跳转到 /authorize,用户登录并同意授权。授权服务器重定向回客户端,并带上授权码;客户端用授权码换取访问令牌:
{
  "access_token": "eyJhbGciOiJSUzI1NiIs...",
  "refresh_token": "def502...",
  "token_type": "Bearer",
  "expires_in": 3600
}
此流程遵循 OAuth 2.1 授权码 + PKCE。
5.6 发起已认证请求 #
客户端在后续请求中,将 access_token 放在 Authorization 头中:
GET /mcp HTTP/1.1
Host: your-server.com
Authorization: Bearer eyJhbGciOiJSUzI1NiIs...
服务器验证令牌有效性及 scope,通过后处理请求。
6. 实现示例:Keycloak + Python MCP 服务器 #
下面用 Keycloak(开源授权服务器)和 Python 搭建一个带授权的 MCP 服务器,供本地测试。
前置要求:已安装 Docker Desktop。
6.1 启动 Keycloak #
在终端执行:
docker run -p 127.0.0.1:8080:8080 -e KC_BOOTSTRAP_ADMIN_USERNAME=admin -e KC_BOOTSTRAP_ADMIN_PASSWORD=admin quay.io/keycloak/keycloak start-dev- 浏览器访问
http://localhost:8080可进入 Keycloak 管理界面 - 默认管理员:
admin/admin
仅用于测试:上述配置不适合生产环境,详见 Keycloak 生产配置。
6.2 配置 Keycloak #
步骤 1:创建 scope mcp:tools #
- 进入 Client scopes → Create client scope
- 名称填
mcp:tools - 类型设为 Default,开启 Include in token scope
步骤 2:配置 audience(受众) #
- 打开
mcp:toolsscope → Mappers → Configure a new mapper - 选择 Audience
- Name:
audience-config - Included Custom Audience:
http://localhost:3000(本示例 MCP 服务器地址)
受众用于确保令牌是发给「你的 MCP 服务器」的,避免令牌被滥用。
步骤 3:允许动态客户端注册 #
- 进入 Clients → Client registration → Trusted Hosts
- 关闭 Client URIs Must Match
- 添加你的主机 IP(如
ifconfig/ipconfig查看,或从 Keycloak 日志中类似Failed to verify remote host : 192.168.x.x获取)
步骤 4:注册 MCP 服务器用客户端 #
MCP 服务器需要自己的客户端,用于向 Keycloak 做令牌内省(验证令牌是否有效):
- Clients → Create client
- 设置 Client ID(如
mcp-server) - 启用 Client authentication
- 保存后,在 Credentials 中复制 Client Secret
安全:不要将 Client Secret 写进代码,应使用环境变量或密钥管理服务。
6.3 MCP 服务器代码 #
完整示例见 min-py-mcp-auth。下面给出核心结构。
配置文件 config.py #
"""Configuration settings for the MCP auth server."""

import os
from typing import Optional


class Config:
    """Configuration class that loads from environment variables with sensible defaults."""

    # Server settings
    HOST: str = os.getenv("HOST", "localhost")
    PORT: int = int(os.getenv("PORT", "3000"))

    # Auth server settings
    AUTH_HOST: str = os.getenv("AUTH_HOST", "localhost")
    AUTH_PORT: int = int(os.getenv("AUTH_PORT", "8080"))
    AUTH_REALM: str = os.getenv("AUTH_REALM", "master")

    # OAuth client settings
    OAUTH_CLIENT_ID: str = os.getenv("OAUTH_CLIENT_ID", "mcp-server")
    OAUTH_CLIENT_SECRET: str = os.getenv("OAUTH_CLIENT_SECRET", "your-secret-here")

    # Server settings
    MCP_SCOPE: str = os.getenv("MCP_SCOPE", "mcp:tools")
    OAUTH_STRICT: bool = os.getenv("OAUTH_STRICT", "false").lower() in ("true", "1", "yes")
    TRANSPORT: str = os.getenv("TRANSPORT", "streamable-http")

    @property
    def server_url(self) -> str:
        """Build the server URL."""
        return f"http://{self.HOST}:{self.PORT}"

    @property
    def auth_base_url(self) -> str:
        """Build the auth server base URL."""
        return f"http://{self.AUTH_HOST}:{self.AUTH_PORT}/realms/{self.AUTH_REALM}/"

    def validate(self) -> None:
        """Validate configuration."""
        if self.TRANSPORT not in ["sse", "streamable-http"]:
            raise ValueError(f"Invalid transport: {self.TRANSPORT}. Must be 'sse' or 'streamable-http'")


config = Config()
服务器实现(FastMCP + 令牌验证) #
import datetime
import logging
from typing import Any

from pydantic import AnyHttpUrl

from mcp.server.auth.settings import AuthSettings
from mcp.server.fastmcp.server import FastMCP

from .config import config
from .token_verifier import IntrospectionTokenVerifier

logger = logging.getLogger(__name__)


def create_oauth_urls() -> dict[str, str]:
    """Create OAuth URLs based on configuration (Keycloak-style)."""
    from urllib.parse import urljoin

    auth_base_url = config.auth_base_url

    return {
        "issuer": auth_base_url,
        "introspection_endpoint": urljoin(auth_base_url, "protocol/openid-connect/token/introspect"),
        "authorization_endpoint": urljoin(auth_base_url, "protocol/openid-connect/auth"),
        "token_endpoint": urljoin(auth_base_url, "protocol/openid-connect/token"),
    }


def create_server() -> FastMCP:
    """Create and configure the FastMCP server."""

    config.validate()

    oauth_urls = create_oauth_urls()

    token_verifier = IntrospectionTokenVerifier(
        introspection_endpoint=oauth_urls["introspection_endpoint"],
        server_url=config.server_url,
        client_id=config.OAUTH_CLIENT_ID,
        client_secret=config.OAUTH_CLIENT_SECRET,
    )

    app = FastMCP(
        name="MCP Resource Server",
        instructions="Resource Server that validates tokens via Authorization Server introspection",
        host=config.HOST,
        port=config.PORT,
        debug=True,
        streamable_http_path="/",
        token_verifier=token_verifier,
        auth=AuthSettings(
            issuer_url=AnyHttpUrl(oauth_urls["issuer"]),
            required_scopes=[config.MCP_SCOPE],
            resource_server_url=AnyHttpUrl(config.server_url),
        ),
    )

    @app.tool()
    async def add_numbers(a: float, b: float) -> dict[str, Any]:
        """Add two numbers together. Requires OAuth."""
        result = a + b
        return {
            "operation": "addition",
            "operand_a": a,
            "operand_b": b,
            "result": result,
            "timestamp": datetime.datetime.now().isoformat()
        }

    @app.tool()
    async def multiply_numbers(x: float, y: float) -> dict[str, Any]:
        """Multiply two numbers together. Requires OAuth."""
        result = x * y
        return {
            "operation": "multiplication",
            "operand_x": x,
            "operand_y": y,
            "result": result,
            "timestamp": datetime.datetime.now().isoformat()
        }

    return app


def main() -> int:
    """Run the MCP Resource Server."""
    logging.basicConfig(level=logging.INFO)

    try:
        config.validate()
        oauth_urls = create_oauth_urls()
    except ValueError as e:
        logger.error("Configuration error: %s", e)
        return 1

    try:
        mcp_server = create_server()
        logger.info("Starting MCP Server on %s:%s", config.HOST, config.PORT)
        logger.info("Authorization Server: %s", oauth_urls["issuer"])
        mcp_server.run(transport=config.TRANSPORT)
        return 0
    except Exception:
        logger.exception("Server error")
        return 1


if __name__ == "__main__":
    exit(main())
令牌验证 token_verifier.py #
通过 Keycloak 的令牌内省接口验证客户端传来的 token 是否有效:
"""Token verifier using OAuth 2.0 Token Introspection (RFC 7662)."""

import logging
from typing import Any

from mcp.server.auth.provider import AccessToken, TokenVerifier
from mcp.shared.auth_utils import check_resource_allowed, resource_url_from_server_url

logger = logging.getLogger(__name__)


class IntrospectionTokenVerifier(TokenVerifier):
    """Verify token via Authorization Server introspection endpoint."""

    def __init__(
        self,
        introspection_endpoint: str,
        server_url: str,
        client_id: str,
        client_secret: str,
    ):
        self.introspection_endpoint = introspection_endpoint
        self.server_url = server_url
        self.client_id = client_id
        self.client_secret = client_secret
        self.resource_url = resource_url_from_server_url(server_url)

    async def verify_token(self, token: str) -> AccessToken | None:
        """Verify token via introspection endpoint."""
        import httpx

        if not self.introspection_endpoint.startswith(("https://", "http://localhost", "http://127.0.0.1")):
            return None

        timeout = httpx.Timeout(10.0, connect=5.0)
        limits = httpx.Limits(max_connections=10, max_keepalive_connections=5)

        async with httpx.AsyncClient(timeout=timeout, limits=limits, verify=True) as client:
            try:
                form_data = {
                    "token": token,
                    "client_id": self.client_id,
                    "client_secret": self.client_secret,
                }
                headers = {"Content-Type": "application/x-www-form-urlencoded"}

                response = await client.post(
                    self.introspection_endpoint,
                    data=form_data,
                    headers=headers,
                )

                if response.status_code != 200:
                    return None

                data = response.json()
                if not data.get("active", False):
                    return None

                if not self._validate_resource(data):
                    return None

                return AccessToken(
                    token=token,
                    client_id=data.get("client_id", "unknown"),
                    scopes=data.get("scope", "").split() if data.get("scope") else [],
                    expires_at=data.get("exp"),
                    resource=data.get("aud"),
                )

            except Exception:
                return None

    def _validate_resource(self, token_data: dict[str, Any]) -> bool:
        """Validate token was issued for this resource server."""
        if not self.server_url or not self.resource_url:
            return False

        aud: list[str] | str | None = token_data.get("aud")
        if isinstance(aud, list):
            return any(self._is_valid_resource(a) for a in aud)
        if isinstance(aud, str):
            return self._is_valid_resource(aud)
        return False

    def _is_valid_resource(self, resource: str) -> bool:
        """Check if the given resource matches our server."""
        return check_resource_allowed(self.resource_url, resource)
更多细节见 Python SDK 文档。
7. 测试 MCP 服务器 #
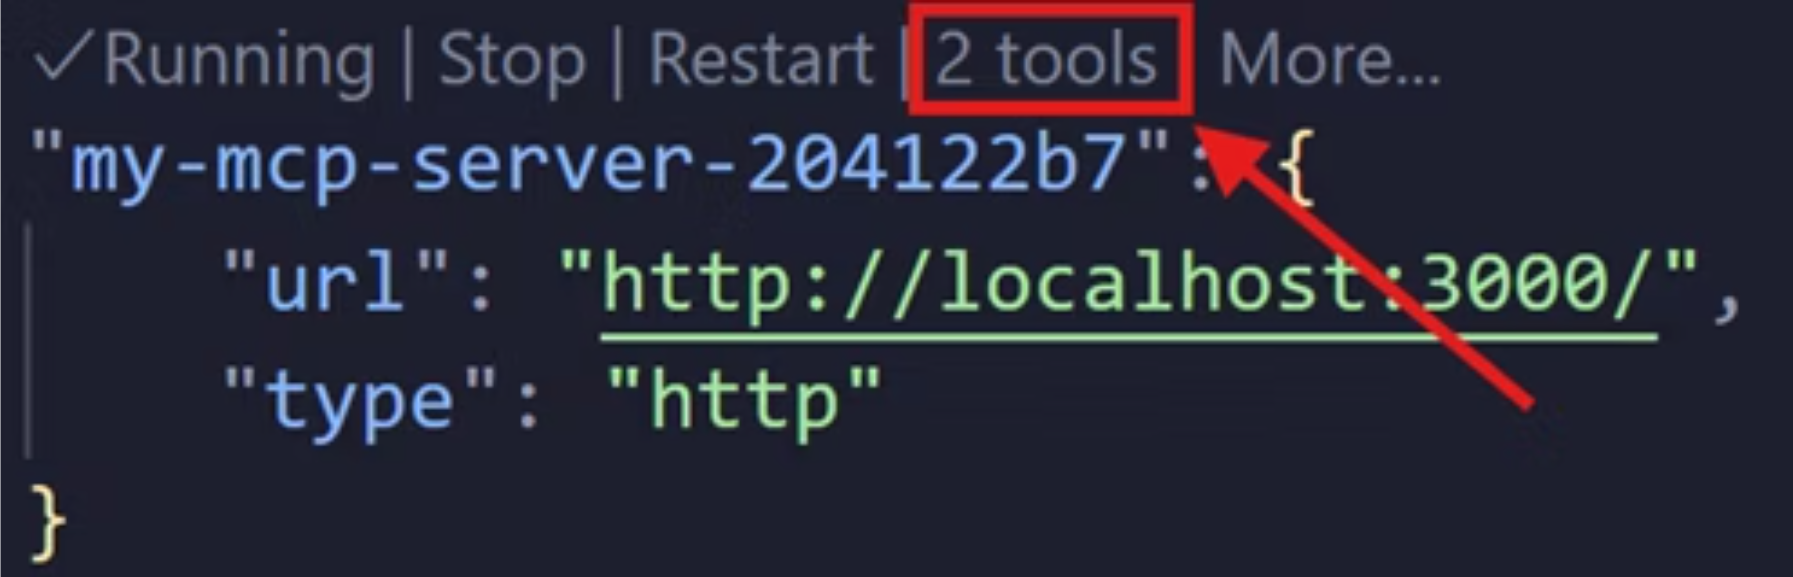
以 VS Code 为例(任意支持 MCP 授权的客户端均可):
Cmd + Shift + P(Mac)或Ctrl + Shift + P(Windows)→ 选择 MCP: Add server…- 选择 HTTP,输入
http://localhost:3000 - 为服务器起一个名称
连接时,会打开浏览器,提示你同意 VS Code 访问 mcp:tools scope。同意后,在 mcp.json 中可看到该服务器及其工具。
在聊天中可通过 # 调用 add_numbers、multiply_numbers 等工具。

8. 常见安全陷阱及规避 #
| 陷阱 | 规避方法 |
|---|---|
| 自己实现令牌验证 | 使用成熟的安全库,不要从零实现 |
| 使用长期访问令牌 | 尽量用短期 token,减少泄露后的影响 |
| 不验证令牌 | 必须验证:是否有效、是否发给本服务器、scope 是否足够 |
| 明文存储令牌 | 用加密存储,并做好访问控制和过期清理 |
| 生产环境用 HTTP | 除 localhost 测试外,一律用 HTTPS |
| 使用通配 scope | 按工具或能力拆分 scope,最小权限 |
| 记录凭据 | 不要记录 Authorization 头、token、授权码、密钥 |
| 混淆应用与资源服务器凭据 | MCP 服务器的 client secret 与用户流程的凭据分开管理 |
| 401 缺少正确质询 | 返回带 Bearer、realm、resource_metadata 的 WWW-Authenticate |
| DCR 无控制 | 限制受信任主机,做好注册审计 |
| 多租户 realm 混淆 | 固定单一 issuer,拒绝其他 realm 的令牌 |
| 通用受众 | 要求 audience 与你的服务器匹配,避免 api 等通用值 |
| 错误信息泄露 | 对客户端返回通用错误,详细原因仅内部记录 |
| 用 Mcp-Session-Id 做授权 | 不要将授权与 Session ID 绑定,认证变更时重新生成 |
完整安全指南见 安全最佳实践。
9. 相关标准与延伸阅读 #
MCP 授权基于以下标准:
| 标准 | 用途 |
|---|---|
| OAuth 2.1 | 核心授权框架 |
| RFC 8414 | 授权服务器元数据发现 |
| RFC 7591 | 动态客户端注册 |
| RFC 9728 | 受保护资源元数据 |
| RFC 8707 | 资源指示符 |
延伸阅读: